
Planner guide
Cabinet back panel: nailed on or in a groove
The same wall unit in 3D, once with the back nailed on and once in a groove: what changes in the sizes, the shelf and the workshop, and how to choose it in the planner.
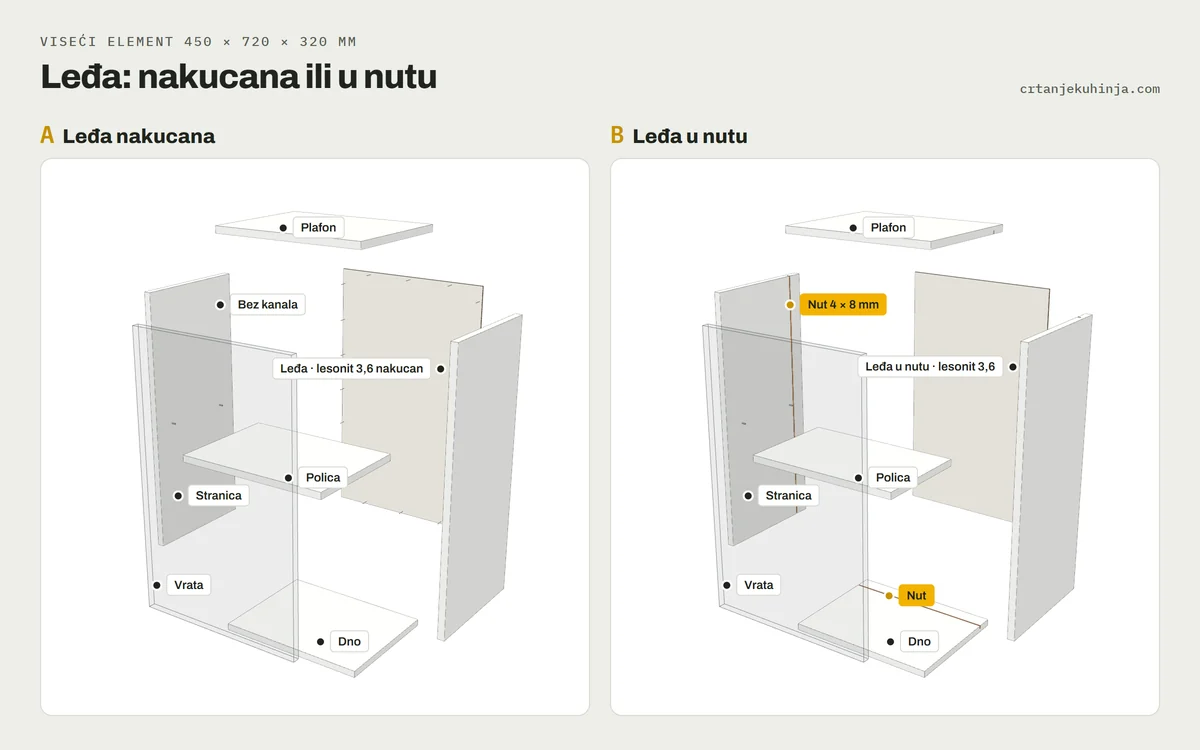
A kitchen cabinet's back panel is a thin sheet of hardboard (3.6 mm), but the way it is fixed decides the cabinet depth, the shelf depth, the sizes in the cutting list and the work the cutting company has to do. The planner offers two ways: nailed on and in a groove. Below is the same wall unit in both versions, so you can compare them from the same angle.
See the difference in 3D
Wall unit 450 × 720 × 320 mm, white chipboard 18 mm. On the left the back is nailed on, on the right it sits in a groove. The slider assembles and explodes the unit, and the buttons change the view:
- 3D view - the exploded unit, every part labelled
- Groove close-up - the top of the side panel, where the 4 × 8 mm groove shows
- From the back - the assembled unit: hardboard over the edges or set into a frame
Rotate one model and the other follows, so you always compare from the same angle. On a phone, tap Rotate with finger first, otherwise your finger scrolls the page.
Back panel nailed on
The hardboard goes over the back of the carcass and is fixed with staples or small nails, about every ten centimetres around the edge. This is the usual way and any workshop can do it, with no machining of the boards.
- the back is 4 mm narrower and lower than the carcass (2 mm each side) so the edge does not stick out: 716 × 446 mm for this unit
- the unit is 323.6 mm deep: 320 carcass plus 3.6 hardboard
- the shelf reaches the hardboard: 300 mm deep, 20 mm short of the carcass
- the hardboard edge shows on the side of the unit, by the wall
Back panel in a groove
A 4 × 8 mm groove is cut into the sides, bottom and top, 40 mm from the back edge. The hardboard slides into the groove before the carcass is closed, so it is held on all four sides and the unit is stiffer.
- the back is 16 mm larger than the inside opening (8 mm goes into the groove on each side): 700 × 430 mm for this unit
- the unit is 320 mm deep, and 40 mm stays free behind the back for cables, sockets and an uneven wall
- the shelf starts in front of the hardboard: 256 mm deep
- the hardboard is not visible from outside, the side is clean up to the wall
The difference in numbers
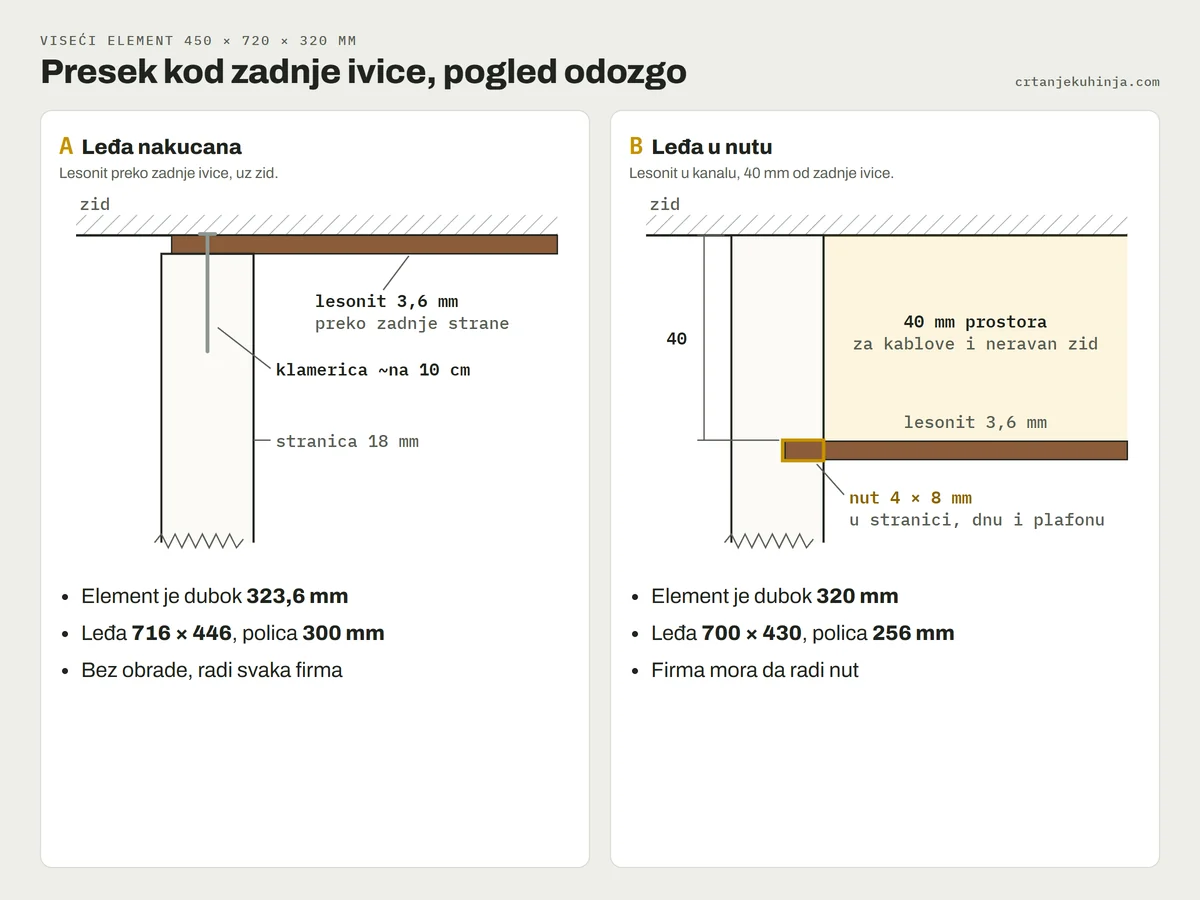
Section at the back edge, seen from above: on the left hardboard nailed over the side panel, on the right hardboard in a 4 × 8 mm groove, 40 mm from the back edge 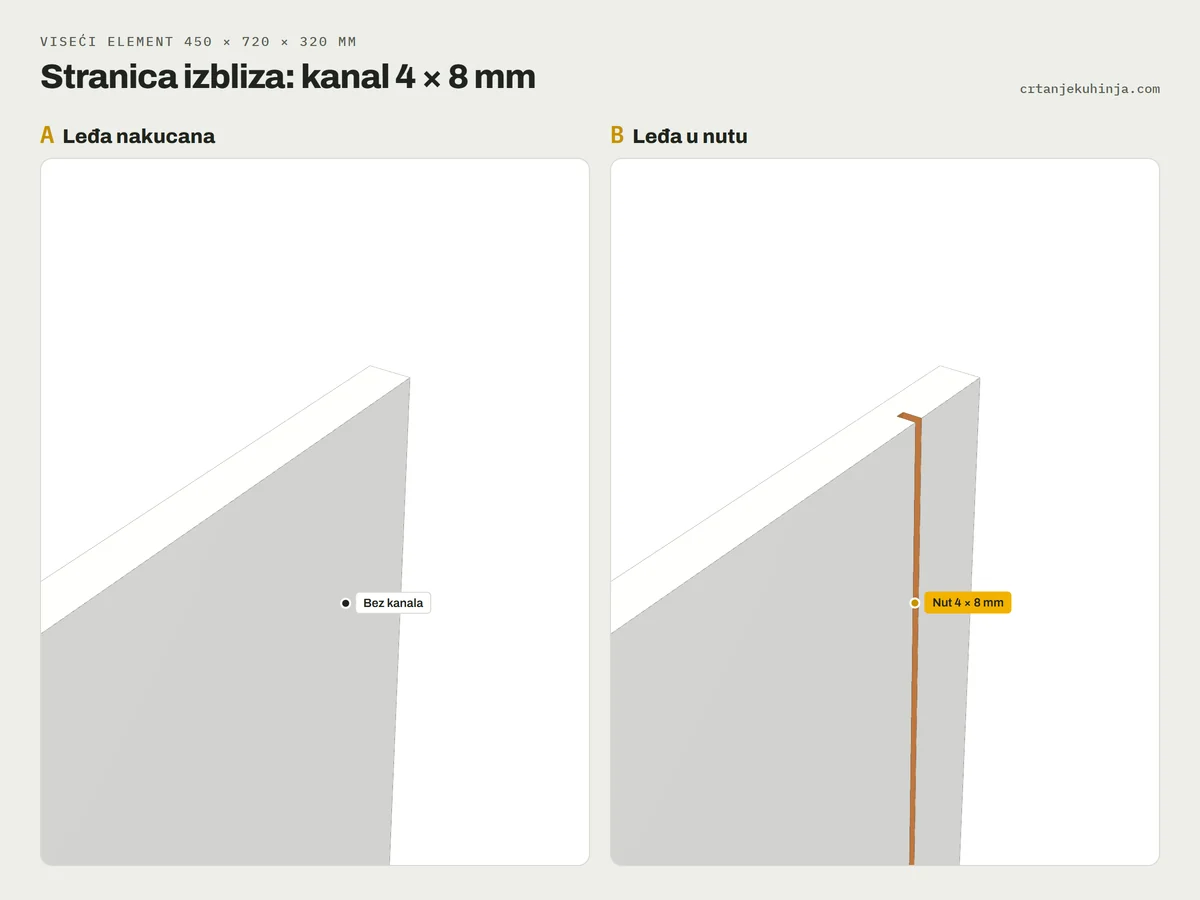
Side panel close-up: no groove with a nailed-on back, a 4 × 8 mm groove along the full height with a back in a groove 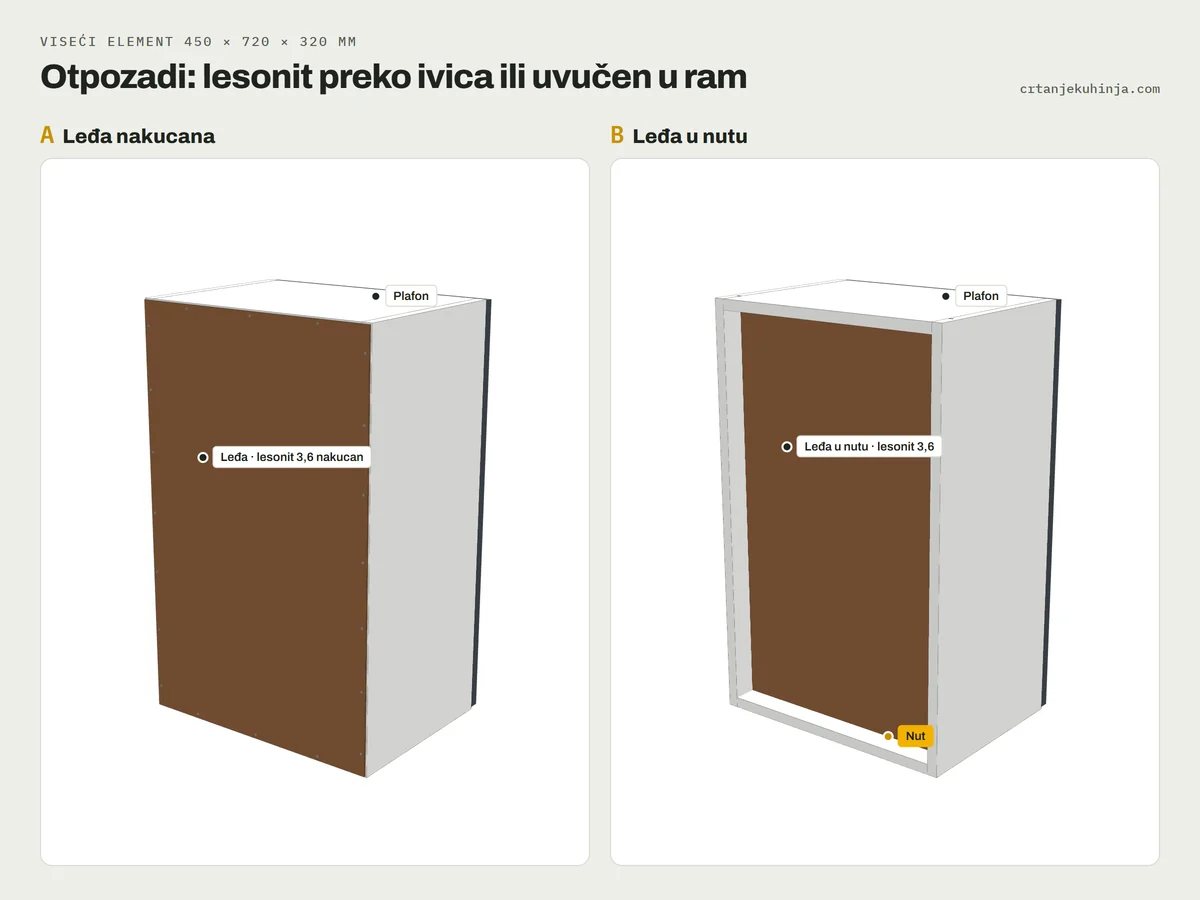
The unit from the back: nailed-on hardboard covers the whole back, hardboard in a groove sits 40 mm inside a frame of sides, bottom and top 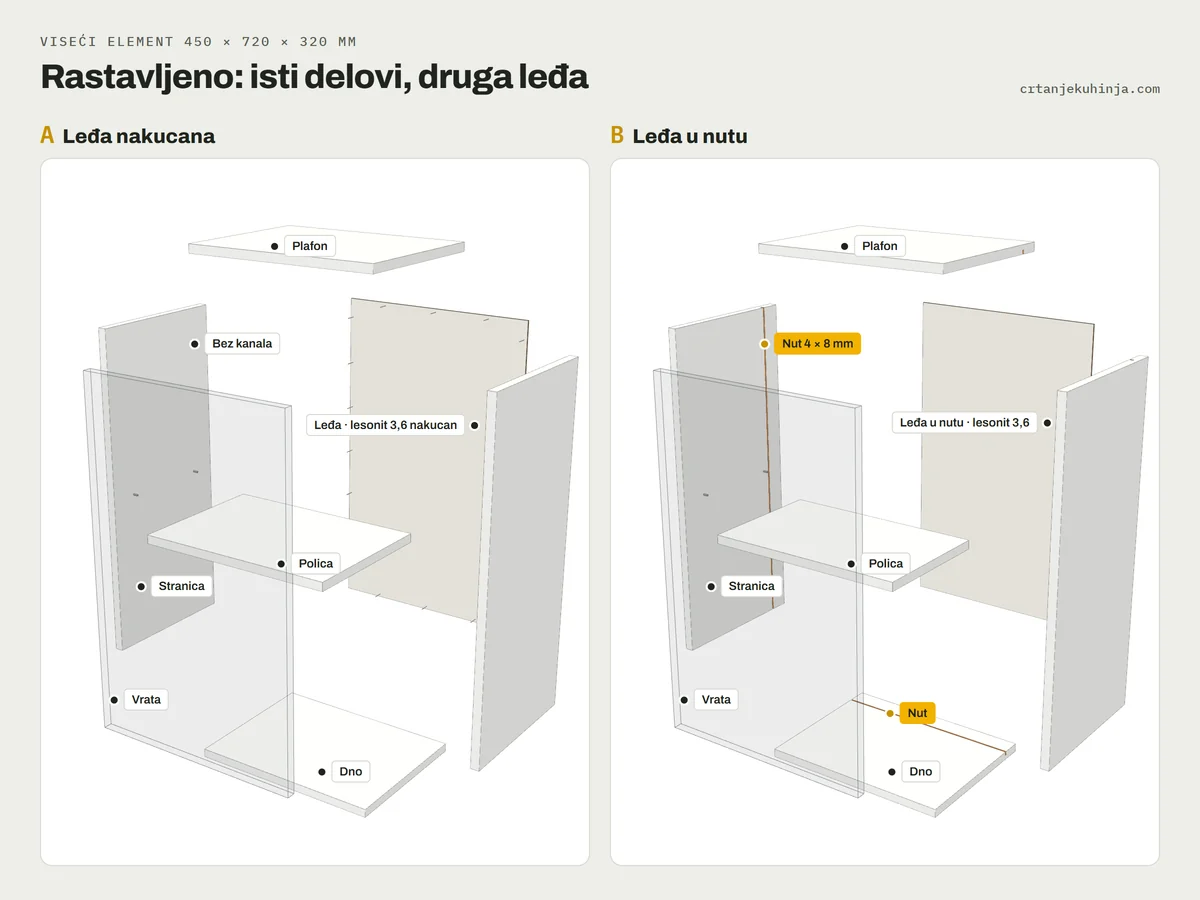
Exploded wall unit in both versions: sides, top, bottom, shelf, door and back, each labelled
For a 450 × 720 × 320 mm wall unit:
- back: 716 × 446 nailed on, 700 × 430 in a groove
- shelf: 413 × 300 nailed on, 413 × 256 in a groove
- unit depth: 323.6 nailed on, 320 in a groove
- space behind the back: none when nailed on, 40 mm with the groove
- machining: none when nailed on, a 4 × 8 mm groove in four boards with the groove
The sides (720 × 320), bottom and top (414 × 320) and door (716 × 446) are the same in both. Only the back, the shelf and the machining change.
How to choose it in the planner
In the planner, at the Layout step, the Back panels section has two buttons: Nailed on and In a groove. The choice applies to the whole kitchen, and the planner recalculates the backs and shelves in every unit.
- with the groove, the cutting list notes it next to every board that has one, in the Edging & machining column
- the assembly instructions get the back panel step right after the bottom, because the hardboard goes in before the top
- the groove is not charged on our site; the cutting company may charge for it at its own rates
If you are not sure what your company can do, keep Nailed on: anyone can do it. How the carcass is joined is covered in confirmat screws and dowels, and the full order of work is in the guide kitchen installation step by step.
Frequently asked questions
Which back panel is better, nailed on or in a groove?
It depends on the company and the wall. Nailed on is simpler, any company can do it and it gives a deeper shelf. A back in a groove makes a stiffer unit with a clean side and leaves 40 mm behind the unit for cables and an uneven wall, but it needs a company that machines the groove.
Can every company cut the groove?
No. The groove for hardboard is machined, and most companies that cut and edge boards do not do it. Ask before you order; if they do not, choose a nailed-on back or cut the groove yourself.
Why is the shelf shallower with a groove?
Because the hardboard sits 40 mm in front of the back edge and the shelf starts in front of it. In a 320 mm deep wall unit the shelf is 256 mm instead of 300 mm.
Is the groove charged extra?
Not on our site: the groove shows in the cutting list, but it has no separate line in the price. The cutting company may charge for the machining at its own rates, so check the price with them.