

Planner guide
Kitchen filler panels: where they go and how to draw them
A 40 mm filler against the wall is not decoration but an allowance for a crooked wall. Where fillers go, how they are added and when an 18 mm side cover panel closes a tall unit.
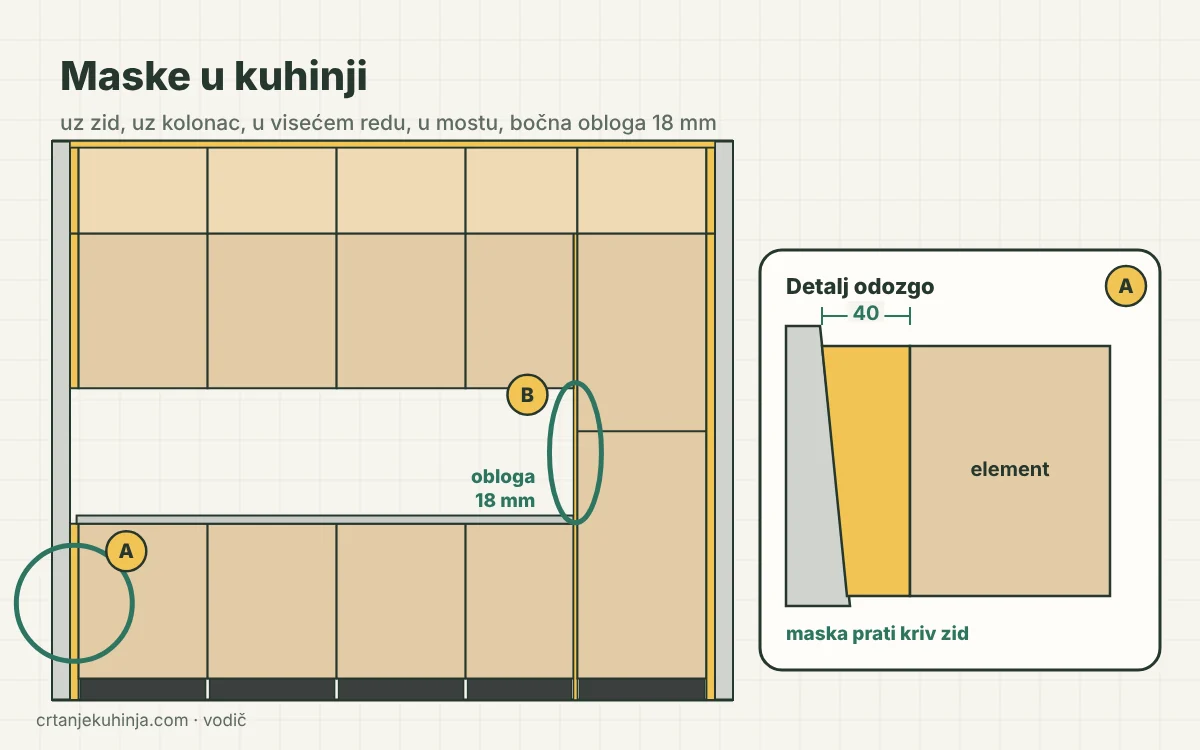
A filler panel is a narrow strip in the front decor that closes the gap between a cabinet and a wall, the ceiling or the next cabinet. The standard is 40 mm. It is not decoration: walls and corners are never perfectly true, so the filler takes up the difference, the fitter scribes it on site, and the cabinets stay square. Here is where fillers go, when the planner adds them itself, how you add one by hand and how an 18 mm side cover panel closes the side of a tall unit.
Six places a filler goes
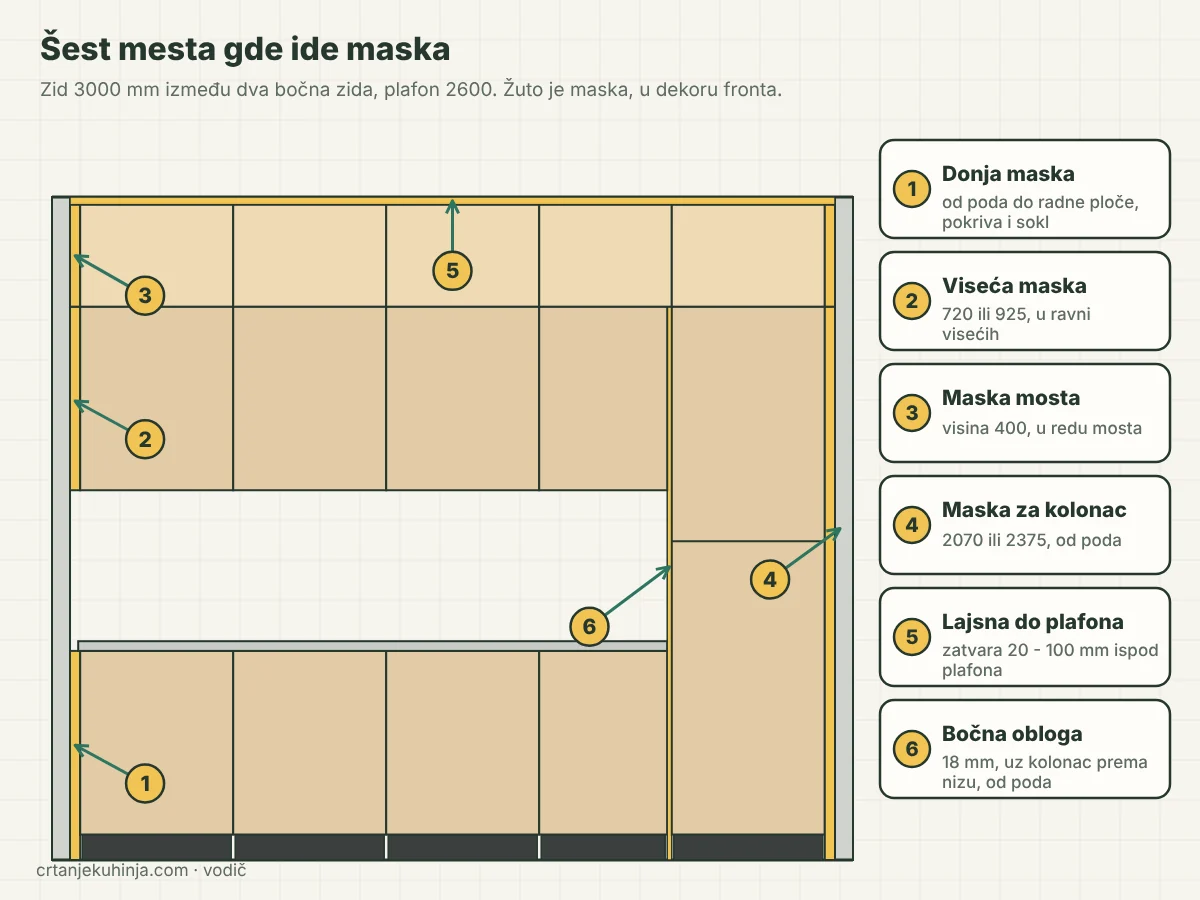
A wall between two side walls from the front, with six marked places: base, wall, bridge and tall-unit filler, trim to the ceiling and an 18 mm side cover panel between the run and the tall unit
- Base filler: from the floor to the worktop, covering the plinth too. The quote adds the plinth height itself, so the filler follows the legs even when you change them.
- Wall filler: in the wall-unit row, 720 or 925 high, hung in line with the wall units and moving with them.
- Tall-unit filler: next to a tall unit, 2070 or 2375, from the floor.
- Bridge filler: in the bridge row, 400 high and as deep as the bridge.
- Trim to the ceiling: sits on a wall or tall unit and closes a gap of 20 to 100 mm up to the ceiling.
- Side cover panel, 18 mm: between the run and the tall unit, the full height of the tall unit, from the floor. It is not a strip from the catalogue but an 18 mm board you switch on in the tall unit itself (see below).
A filler can be 20 to 250 mm wide, the standard is 40. The side cover panel has no width to choose: it is the thickness of the board, 18 mm.
Fillers the planner adds itself
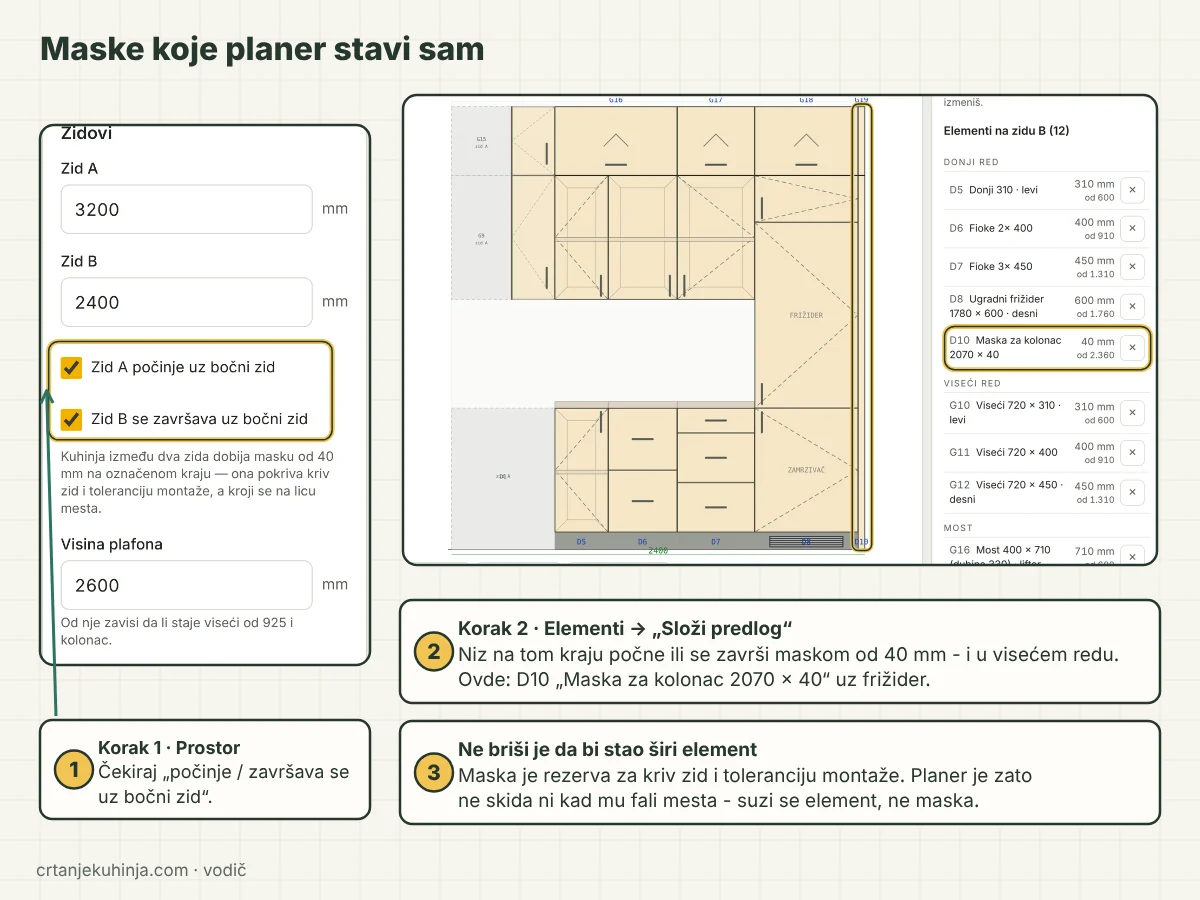
The Room step with the ends against a side wall ticked, and the Cabinets step where the suggestion put a 2070 × 40 tall-unit filler next to the fridge
- Room step. Tick "Wall A starts against a side wall" and/or "Wall B ends against a side wall" (the letter depends on the kitchen shape). This tells the planner the kitchen meets a wall at that end.
- Cabinets step, "Suggest a layout". The run at that end starts or ends with a 40 mm filler, in both the base and the wall row. With a fridge at the end, it is a 2070 × 40 tall-unit filler.
- Gap under the ceiling. If a small gap is left under the ceiling, the suggestion also adds a trim to the ceiling in the front decor. The trim follows the cabinet when it moves.
A filler by hand: from the catalogue or into a gap
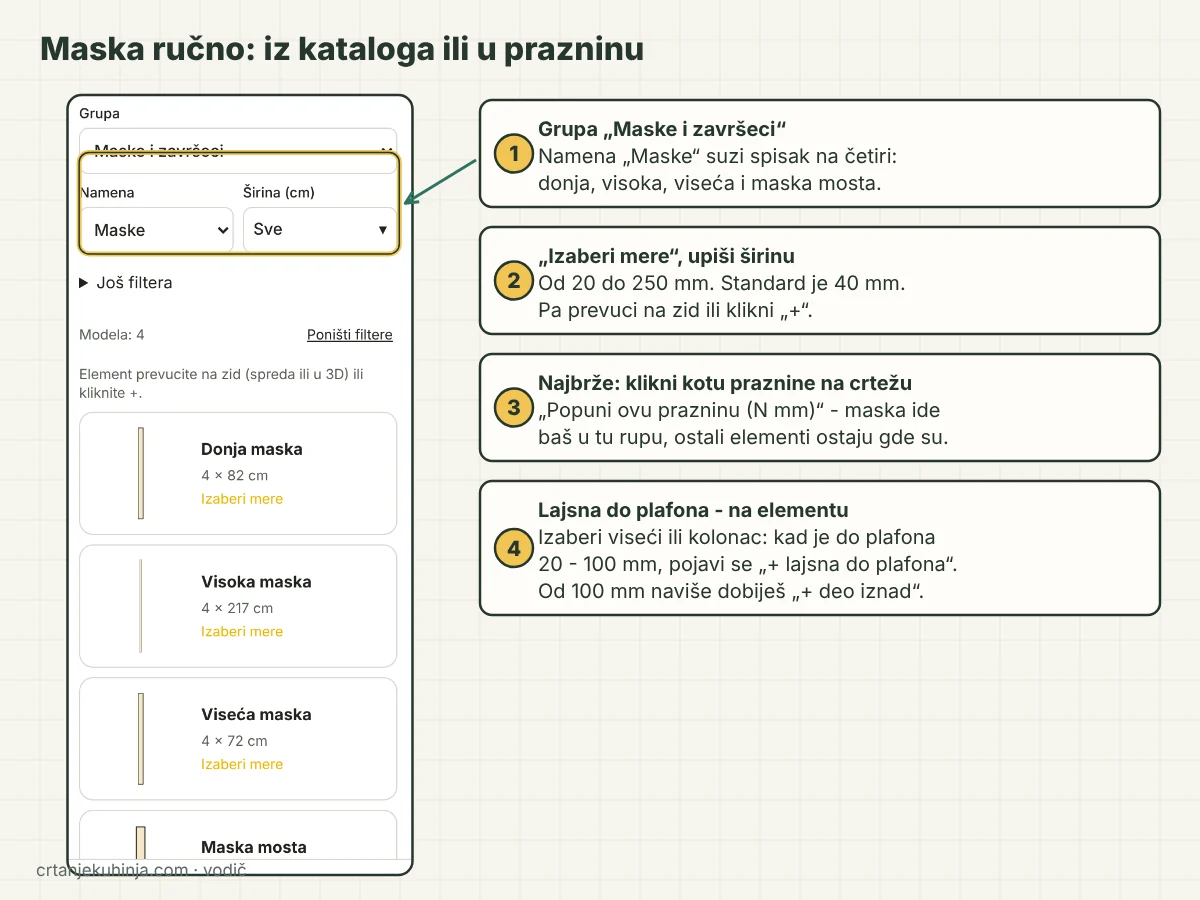
The planner catalogue, group Fillers and ends, purpose Fillers: base, tall, wall and bridge filler, with the steps for adding one by hand
- From the catalogue. Cabinets step → Group "Fillers and ends" → Purpose "Fillers". Four remain: base, tall, wall and bridge filler.
- Size. "Choose dimensions", enter the width (20 - 250 mm), then drag the filler onto the wall or click "+".
- Into a gap. The quickest way is to click the gap dimension on the drawing ("Fill this gap") and pick a filler: it goes exactly into that gap and the other cabinets stay where they are. A cabinet wider than the gap shrinks to fit it.
- Trim to the ceiling. Select a wall or tall unit. When there are 20 to 100 mm to the ceiling, "+ trim to the ceiling" appears in the panel. From 100 mm up the planner offers "+ part above", a cabinet with a door (see the guide to bridge units).
The 18 mm side cover panel between the run and the tall unit
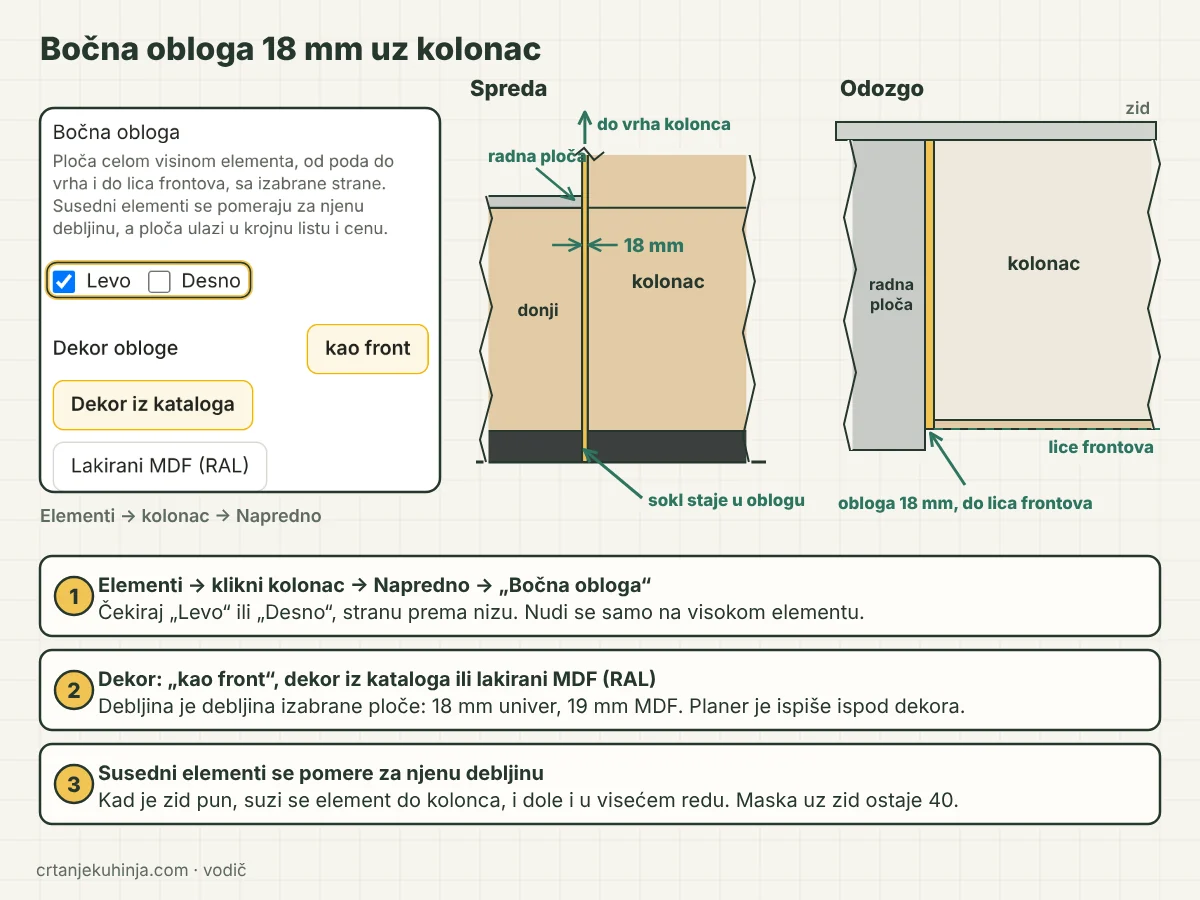
The Advanced panel with the side cover panel switched on, a front view where the plinth and the worktop stop at the panel, and a top view where the panel runs to the face of the fronts
When the side of a tall unit shows, or you want a clean joint between the run and a fridge, oven or larder unit, a full-height board goes there instead of a strip.
- Where to switch it on. Cabinets step → click the tall unit → open "Advanced" → "Side cover panel" → tick "Left" or "Right", the side facing the run. It is offered only on a tall unit.
- What it is. A board from the floor to the top of the tall unit and to the face of the fronts. It covers the end of the plinth too, and the worktop and the base unit stop against it.
- Decor and thickness. "Same as the front", a decor from the catalogue or lacquered MDF (RAL). The thickness is that of the chosen board: 18 mm for chipboard, 19 for MDF. The planner shows it under the decor.
- Space in the run. The neighbouring cabinets move over by the panel's thickness. When the wall is full, the planner narrows the neighbouring cabinet, in both the base and the wall row, and the wall filler stays at 40 mm.
- Cutting list and price. The board goes into the cutting list as "Side cover panel", with a fitting note: it is screwed from the inside, through the side of the tall unit.
Why a filler against the wall
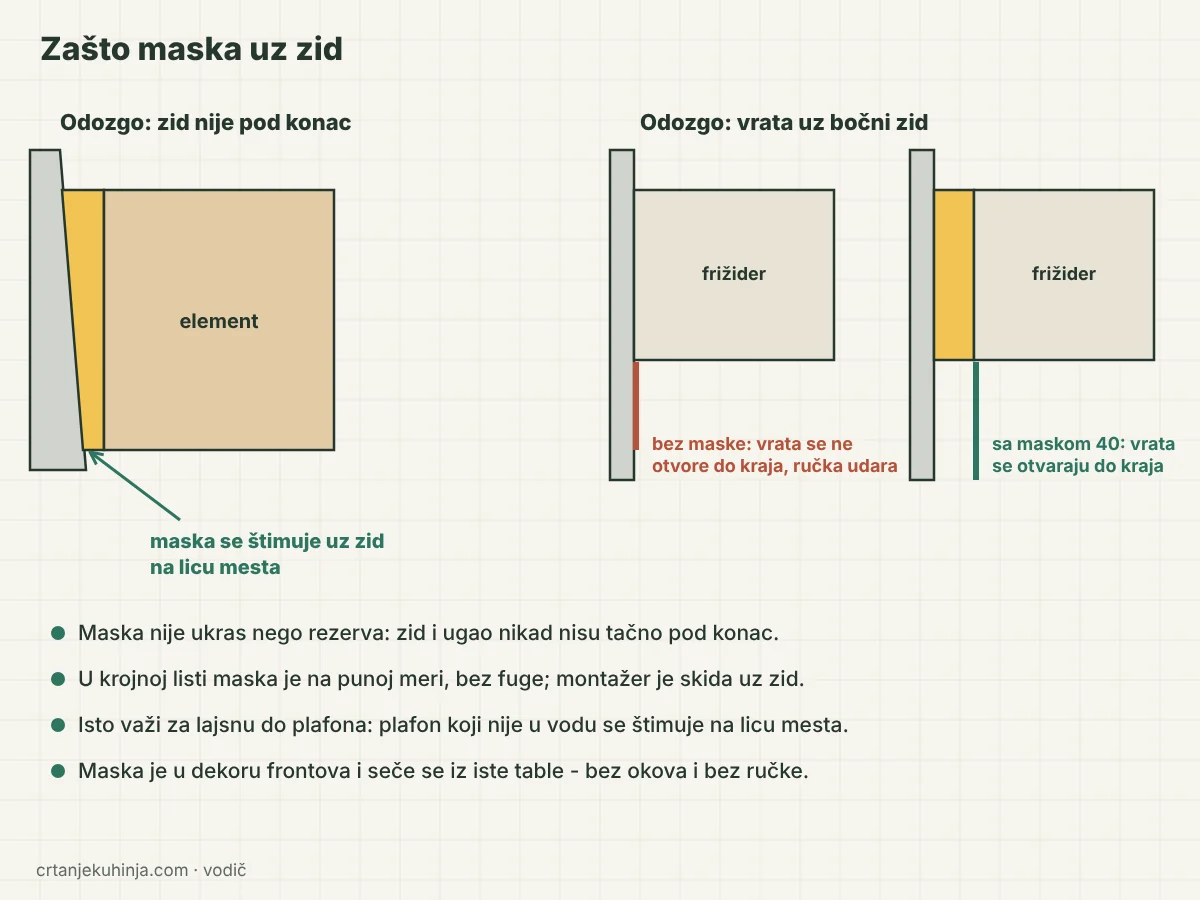
Top view: the filler follows a crooked wall; without a filler the fridge door cannot open fully, with a 40 mm filler it can
- A crooked wall. In the cutting list the filler is at full size, with no gap; the fitter trims it against the wall by exactly as much as the wall needs. The same goes for the trim to the ceiling: a ceiling that is not level is scribed on site.
- Doors and drawers against a wall. Without a filler the handle hits the wall and the door won't open fully. With a fridge that also means the inner drawers cannot come out.
- Cut from the same board. The filler is in the front decor, edge-banded on all four sides, with no hardware and no handle. Every filler in the cutting list comes with a note on how to fit it.
Three other things that are not a wall filler
- The dishwasher panel is the front on the door of an integrated dishwasher (full or semi-integrated), not a strip against the wall.
- "Below the oven: filler" means just a front under the oven, with no drawer behind it.
- The filler in a blind corner unit is part of the corner unit that covers the corner; the planner includes it in the corner unit's size.
For everything else about installation see kitchen installation step by step and the guide to the gola profile in the planner. You draw the kitchen in the planner.
Frequently asked questions
How wide should the filler against the wall be?
The standard is 40 mm, and the planner adds it itself when you tick that the kitchen starts or ends against a side wall. By hand you can go from 20 to 250 mm, for example when a leftover remains that no cabinet can take. Between the run and a tall unit an 18 mm side cover panel, the full height of the tall unit, can go instead of a filler.
Does a filler go in the wall-unit row too?
Yes. The wall filler is in line with the wall units and the same height (720 or 925). The suggestion puts it against the wall together with the base filler.
What is a trim to the ceiling and when is it added?
It is a filler that sits on a wall or tall unit and closes a 20 to 100 mm gap up to the ceiling. For a bigger gap above a wall unit you add a cabinet: "+ part above" or a bridge unit.
How is a filler fixed?
Base, wall and tall-unit fillers are screwed from the inside, through the side of the neighbouring cabinet. A trim to the ceiling is fixed from below, through the top panel of the cabinet it sits on. Every filler in the cutting list comes with a fitting note.