
Planning
How to plan a kitchen yourself: from measuring to a 3D drawing
The order professionals follow: measurements, floor plan, services, layout by zones — and only then 3D. With the numbers for every step.
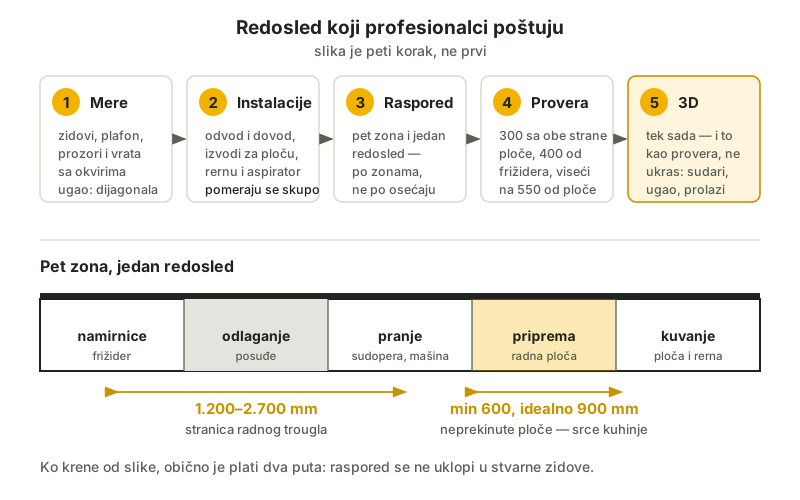
A kitchen is not planned starting from the colour of the fronts but from the wall. The order professionals follow is always the same: measurements, floor plan, services, layout, and only at the end the picture. Anyone who starts from the picture usually pays for it twice. Here is the whole route, step by step, with the numbers to rely on.
Step 1: measure the room properly
It all starts with a tape measure: the length of each wall, the ceiling height, the dimensions of the windows and doors including their frames, and the corner — which is not checked with a protractor but by measuring the diagonal. The whole procedure, with a form to print, is in our measuring guide — eight measurements, in the order they are actually taken.
Step 2: mark the services on the plan
Waste and water supply, earthed sockets, the connection points for the hob, the oven and the extractor hood, gas if there is any. Services are the most expensive thing to move, so the layout starts from them: the sink goes on the waste, the dishwasher next to the sink (they share the trap and the supply), and the hob on its own connection.
Step 3: layout by zones, not by feel
A kitchen works in five zones and one order: food (fridge) → storage (crockery) → washing (sink and dishwasher) → preparation → cooking (hob and oven). Two numbers protect the whole layout:
- the preparation zone between the sink and the hob: at least 600 mm, ideally 900 mm of uninterrupted worktop
- the work triangle fridge–sink–hob: each side 1,200 to 2,700 mm
Step 4: check the safety clearances
At least 300 mm of worktop on both sides of the hob; the hob away from the sink (300 mm) and the fridge (400 mm); wall cabinets at 550 mm above the worktop; the extractor hood according to the instructions for your own model. We wrote about this in detail in how high above the hob a cabinet may hang.
Step 5: only now 3D
Once the measurements, the services and the layout hold, 3D stops being decoration and becomes a check: you can see whether the doors collide, whether the corner swallows more than it gives, whether the walkway is wide enough. In the planner everything above happens in one tool — you enter the measurements, you arrange the cabinets, the planner checks the triangle, the heights above the worktop and the collisions by itself, and the material and price calculation comes with every move. Free, in the browser.
If you would rather leave that job to someone with thirty years of practice, there is also 3D kitchen drawing as a service.
Frequently asked questions
In what order is a kitchen planned?
Room measurements → services → layout by zones (food, storage, washing, preparation, cooking) → checking the clearances → 3D view. Colours and materials come last.
Can I plan a kitchen myself, without an architect?
You can, if you respect the numbers: 600–900 mm of preparation, 300 mm around the hob, a triangle of 1,200 to 2,700 mm per side. The planner checks the triangle, the heights and the collisions by itself; keep the clearances around the hob according to this list — before you cut anything.
What is the most common mistake when planning on your own?
Starting from the picture instead of from the measurements — and then a fine layout does not fit the real walls. Second on the list: forgotten services, which later move the sink across the whole kitchen.