

Guide
How to prepare your room for a kitchen design
Measurements, photographs and the list of details the designer needs — get it all ready in half an hour and the design starts without any waiting.
A good design starts before the designer does: with measurements, photographs and a few answers only you can give. This guide is a list of everything you need to prepare — half an hour of work buys you a design that starts straight away, with no emails going back and forth.
Measurements: the basis of everything
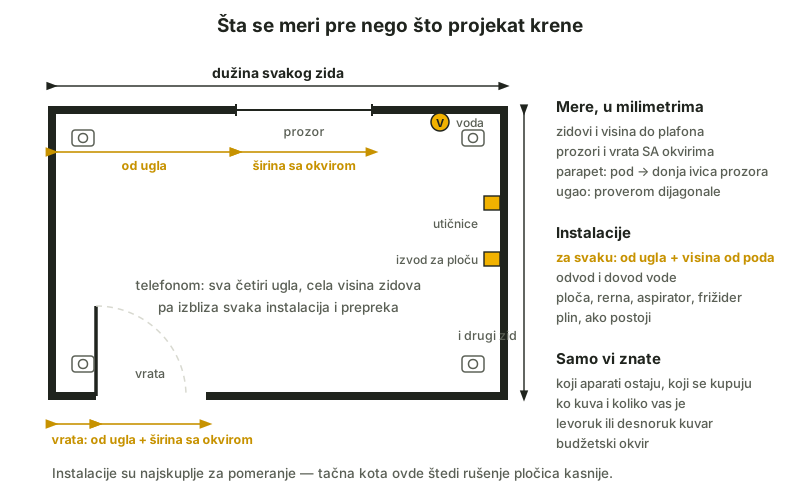
With a tape measure, in millimetres, twice over:
- the length of every wall the kitchen will stand against, and the height to the ceiling
- windows and doors including their frames: width, height, and the distance from the nearest corner
- the sill height (from the floor to the bottom edge of the window)
- the corner: not with a protractor but with a check — set out in full in the measuring instructions, which also include a printable form
Services: where everything comes out of the wall
For each one, note the distance from the corner and the height from the floor:
- the waste and the water supply (the sink; the dishwasher connects to the same trap)
- sockets and outlets: hob, oven, extractor hood, fridge
- gas, if there is any — with a note of who the licensed installer is
Photographs: four corners and the details
A phone is enough: photograph the room from all four corners (so that the walls are visible over their full height), then take close-ups of every service and every obstruction — a radiator, a service duct, a sloping ceiling, a beam. A photograph often reveals what gets missed while measuring.
The details only you know
- which appliances are being kept and which are being bought (built-in or freestanding)
- who cooks and how much — one cook and a family of five do not call for the same layout
- whether the main cook is left- or right-handed (the direction the work flows)
- the budget — so that the materials are chosen within it, not after it
What comes next
With this in hand you have two routes: on your own in the planner — you enter the measurements, the cabinets are arranged and the price is calculated immediately; or the 3D service — you send what you have prepared and the studio takes the drawing over. The ordering steps are described in a separate guide.
Frequently asked questions
What is the minimum needed for a design to start?
Wall measurements with the ceiling height, window and door measurements including the frames, and the position of the waste and of the main electrical outlets. Photographs from the four corners settle most of the remaining doubts.
I cannot measure the room myself — what do I do?
Follow the measuring instructions with the printable form: eight measurements, in order, with an explanation of why each one is taken. For the corner there is a check that needs no protractor.
Are photographs compulsory?
No, but they shorten the work: an obstruction the measurements do not show — a beam, a service duct, a sloping ceiling — is visible at once in a photograph.